WordPress VPS optimization is how you get enterprise WordPress performance on a budget. You do not need expensive managed hosting to run a blazing fast WordPress site. Our production setup runs on a $10/month Hetzner VPS with 4GB of RAM and consistently scores 100/100 on Google Lighthouse. No magic plugins, no bloated page builders, just a properly tuned server stack.
Most WordPress speed guides focus on installing caching plugins and hoping for the best. That approach treats symptoms, not causes. True WordPress VPS performance gains come from the server level: how Nginx handles requests, how PHP-FPM manages workers, how MySQL allocates memory, and how all of these services share limited resources without stepping on each other. For WordPress-specific database tuning, see our database optimization guide.
This guide is the server-side companion to our complete WordPress speed optimization guide. We cover the specific configurations, memory calculations, and tuning decisions that make a budget VPS outperform hosting that costs ten times more. Everything here is production-tested on the same stack that powers this site.
If you are comfortable with SSH and editing config files, you can build this stack in an afternoon. Let’s get into it.
Key Takeaways
- $10/month VPS outperforms $100/month managed hosting when properly configured – our Hetzner VPS (2 vCPU, 4GB RAM) consistently delivers 100/100 Lighthouse scores and sub-2-second load times
- Server-level tuning delivers 10x ROI over premium hosting – PHP-FPM optimization, MySQL InnoDB tuning, and kernel parameter adjustments provide enterprise performance at budget pricing
- 4GB RAM handles thousands of daily pageviews with proper resource allocation – Nginx (50MB), MySQL (1.5-2GB), PHP-FPM (500MB), Redis (100MB), leaving 1.5GB buffer
- Nginx is 4-5x more efficient than Apache for WordPress – event-driven architecture handles 10,000+ concurrent connections vs Apache’s process-per-connection model that caps at 150-400
- OPcache eliminates PHP file parsing overhead – stores compiled bytecode in RAM reducing execution time by 50-70% and CPU usage by 40-60% on every request
Key takeaway: A $10/month Hetzner VPS with 2 vCPU and 4GB RAM outperforms $100/month managed WordPress hosting with poor caching configuration.
Choosing the Best VPS for WordPress
The minimum specs for a responsive WordPress site are simpler than most people think: 2 CPU cores, 4GB of RAM, and SSD storage. That is enough to serve thousands of pages per day with sub-second load times when the stack is properly configured. You do not need 8 cores or 16GB of RAM for a single WordPress site.
Several providers hit the sweet spot of price and performance in the $5 to $15 per month range. Hetzner offers the best value in Europe with their CX22 (2 vCPU, 4GB RAM, 40GB SSD) at around $5/month. DigitalOcean, Vultr, and Linode all offer comparable plans at $12 to $24/month for the same specs. Any of these will work well.
Why VPS over shared hosting? On shared hosting, you cannot touch Nginx configs, PHP-FPM pool settings, or MySQL tuning. You are stuck with whatever the host decided was “good enough” for thousands of tenants sharing the same box. On a VPS, every setting in this guide is yours to control.
Why a WordPress VPS over managed WordPress hosting like Kinsta or WP Engine? Cheap WordPress hosting with a VPS delivers the same WordPress speed at a fraction of the cost. A managed host charges $30 to $100+ per month for what you can achieve on a $10 VPS. They are selling convenience and support, not superior technology. If you are reading a server tuning guide, you do not need someone else managing your configs. That said, if you want a professionally optimized setup without the DIY, our WordPress speed optimization service includes full server tuning.
One decision that matters more than people realize: datacenter location. Choose a region close to your primary audience. If your visitors are in Europe, pick a Frankfurt or Amsterdam datacenter. If they are in the US, pick New York or San Francisco. That said, if you pair your VPS with Cloudflare edge caching, the origin server location becomes less critical since cached pages are served from the nearest Cloudflare POP anyway.
Nginx vs Apache: Why It Matters
The choice between Nginx and Apache is the single biggest architectural decision for your WordPress server. It affects memory usage, concurrency, and how static files are served. On a budget VPS where every megabyte counts, this choice is not academic.
Apache with mod_php creates a new process for every incoming request. Each process loads the full PHP interpreter and the entire WordPress codebase into memory. Under load, ten concurrent visitors means ten Apache processes, each consuming 30 to 60MB of RAM. On a 4GB VPS, you hit memory limits fast. The OOM killer starts terminating processes, and your site goes down.
Nginx takes a fundamentally different approach. It uses an event-driven architecture where a small number of worker processes handle thousands of concurrent connections. Nginx does not run PHP directly. Instead, it forwards PHP requests to a separate PHP-FPM process pool and serves static files (CSS, JavaScript, images, fonts) directly from disk without ever touching PHP. On a typical WordPress page load, 80% or more of the requests are for static assets. Nginx handles all of them with negligible overhead.
The real power comes from Nginx’s built-in FastCGI cache. This lets Nginx cache entire rendered pages and serve them directly on subsequent requests, completely bypassing PHP and MySQL. A cached page is served in under 10 milliseconds. We cover this in depth in our caching architecture guide.
Here are the key Nginx settings to configure for WordPress on a budget VPS:
# /etc/nginx/nginx.conf

worker_processes auto;           # Match CPU cores
worker_connections 1024;         # Per worker, plenty for small VPS

http {
    # Compression - massive bandwidth savings
    gzip on;
    gzip_comp_level 5;
    gzip_min_length 1000;
    gzip_types text/plain text/css application/json
               application/javascript text/xml
               application/xml application/xml+rss
               text/javascript image/svg+xml;

    # Security headers
    add_header X-Content-Type-Options nosniff;
    add_header X-Frame-Options SAMEORIGIN;
}

# In your server block:
# Static file caching - browser stores these for 1 year
location ~* .(js|css|png|jpg|jpeg|gif|ico|svg|woff2)$ {
    expires 1y;
    add_header Cache-Control "public, immutable";
    access_log off;
}
The worker_processes auto directive matches the number of CPU cores on your VPS. The access_log off on static files avoids unnecessary disk writes for assets that do not need tracking. Gzip at compression level 5 provides a good balance between CPU usage and compression ratio, typically reducing transfer sizes by 60 to 80 percent.
PHP-FPM Tuning
PHP-FPM (FastCGI Process Manager) manages a pool of PHP worker processes that handle WordPress page generation. When a request comes in that is not served from Nginx’s cache, Nginx passes it to one of these workers. Tuning the pool size is critical: too many workers and you run out of RAM, too few and requests queue up under load.
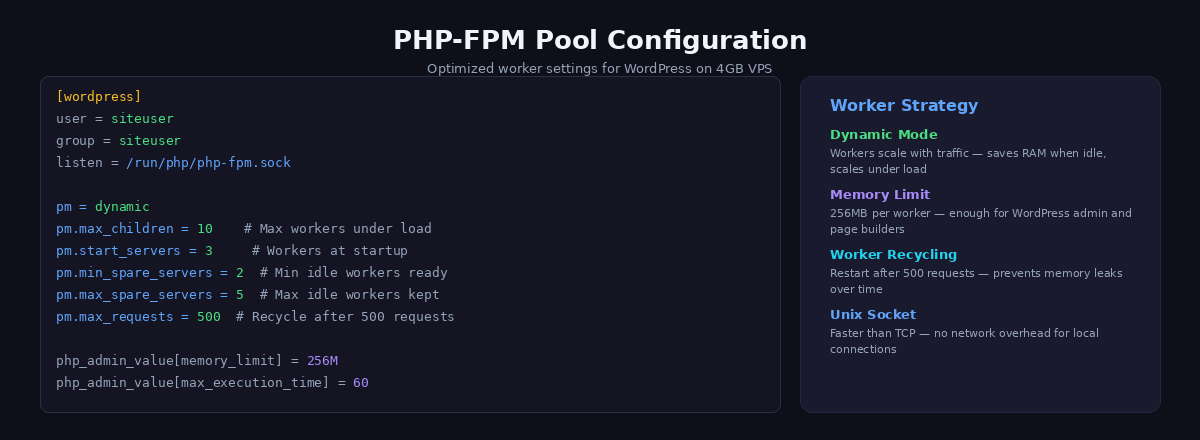
PHP-FPM offers three process manager modes. static spawns a fixed number of workers at startup. dynamic scales workers between a minimum and maximum based on demand. ondemand only spawns workers when requests arrive and kills them after a timeout. For a WordPress site on a budget VPS, dynamic is the right choice. It keeps a few workers warm for immediate response while scaling up during traffic spikes.
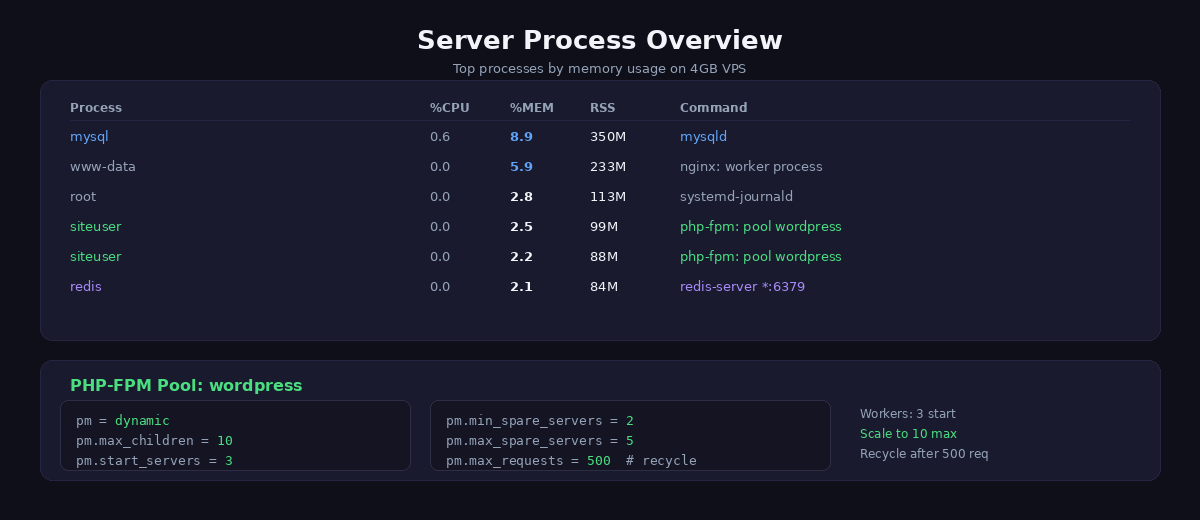
Here is the PHP-FPM pool configuration we run on our 4GB VPS:
# /etc/php/8.3/fpm/pool.d/www.conf

[www]
pm = dynamic
pm.max_children = 10
pm.start_servers = 3
pm.min_spare_servers = 2
pm.max_spare_servers = 5
pm.max_requests = 500

php_admin_value[memory_limit] = 256M
php_admin_value[max_execution_time] = 30
php_admin_value[upload_max_filesize] = 64M
php_admin_value[post_max_size] = 64M
The pm.max_children = 10 setting is the ceiling. Here is the formula we use to calculate it: take your total RAM, subtract what the OS, MySQL, Redis, and Nginx need, then divide by the average memory per PHP worker. On our stack, each WordPress PHP-FPM worker averages around 50MB of real memory usage. With roughly 500MB available for PHP workers after other services are accounted for, 10 workers is the safe maximum.
If pm.max_children is set too high, the Linux OOM killer will start terminating random processes when memory runs out, usually taking down MySQL or PHP-FPM and resulting in 502 Bad Gateway errors. If it is set too low, incoming requests queue behind busy workers and users experience slow responses during traffic spikes. Monitor with pm.status_path to watch active and idle processes over time.
The pm.max_requests = 500 setting recycles each worker after handling 500 requests, preventing memory leaks from poorly coded plugins from accumulating indefinitely.
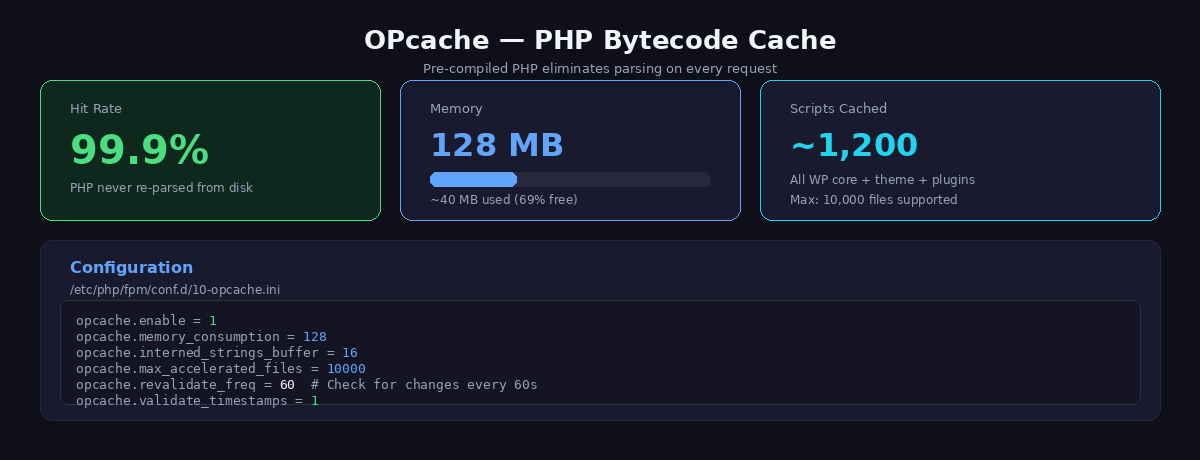
OPcache is the other essential PHP tuning target. Without OPcache, PHP recompiles every WordPress file on every request. With OPcache enabled, compiled bytecode is stored in shared memory and reused across requests. This alone can cut PHP execution time by 50% or more:
# /etc/php/8.3/fpm/conf.d/10-opcache.ini

opcache.enable=1
opcache.memory_consumption=128
opcache.interned_strings_buffer=16
opcache.max_accelerated_files=10000
opcache.revalidate_freq=60
opcache.validate_timestamps=1
The revalidate_freq=60 means PHP checks if source files have changed every 60 seconds. In production, you could set this higher or disable validation entirely and clear OPcache manually after deployments. The memory_consumption=128 allocates 128MB of shared memory for cached bytecode, which is enough for WordPress core, a theme, and a dozen plugins.
Bottom line: Proper PHP-FPM pool configuration prevents memory exhaustion and ensures your 4GB server can handle 50-100 concurrent users without swapping.
MySQL/MariaDB Tuning for Small Servers
WordPress is a database-driven CMS. Every page load that is not served from cache triggers multiple SQL queries to fetch posts, options, metadata, and more. Tuning MySQL (or MariaDB) is where many budget VPS setups fall flat because they run the default configuration, which is designed for a tiny database on a shared server from 2005.
The single most important MySQL setting is innodb_buffer_pool_size. This is the amount of RAM that InnoDB uses to cache table data and indexes. When your entire database fits in the buffer pool, MySQL serves queries from RAM instead of reading from disk. For a WordPress database that is typically between 50MB and 500MB, a 1GB buffer pool means everything lives in memory with room to spare.
Here is the MySQL configuration we run on our 4GB VPS:
# /etc/mysql/mysql.conf.d/mysqld.cnf

[mysqld]
# Buffer pool - 25% of total RAM when sharing with PHP/Nginx/Redis
innodb_buffer_pool_size = 1G
innodb_log_file_size = 256M
innodb_flush_log_at_trx_commit = 2
innodb_flush_method = O_DIRECT

# Connection and cache tuning
max_connections = 50
table_open_cache = 2000
tmp_table_size = 64M
max_heap_table_size = 64M

# Slow query logging (enable to find bottlenecks)
slow_query_log = 1
slow_query_log_file = /var/log/mysql/slow.log
long_query_time = 1
The innodb_flush_log_at_trx_commit = 2 setting deserves explanation. The default value of 1 flushes the transaction log to disk after every single commit, which is the safest setting but causes heavy I/O on every write. Setting it to 2 flushes the log to the OS buffer on each commit but only writes to disk once per second. In the worst case, a server crash could lose up to one second of transactions. For a WordPress blog or business site, this is an acceptable trade-off for a significant write performance improvement. You would not use this for a banking application, but for WordPress content that is backed up regularly, it is a no-brainer.
The innodb_flush_method = O_DIRECT tells InnoDB to bypass the Linux file system cache and write directly. Since InnoDB has its own buffer pool, double-caching through the OS page cache wastes RAM. On a memory-constrained VPS, every megabyte counts.
To verify your buffer pool is effective, check the hit rate:
# Check InnoDB buffer pool hit rate (should be > 99%)
mysqladmin extended-status | grep -i 'innodb_buffer_pool_read'

# Key metrics:
# Innodb_buffer_pool_read_requests = reads served from buffer pool (RAM)
# Innodb_buffer_pool_reads = reads from disk (cache miss)
# Hit rate = requests / (requests + reads) * 100
If your hit rate is below 99%, increase innodb_buffer_pool_size or investigate whether your database has grown larger than expected. For more on database-level optimizations including ProxySQL query caching, see our caching stack guide.
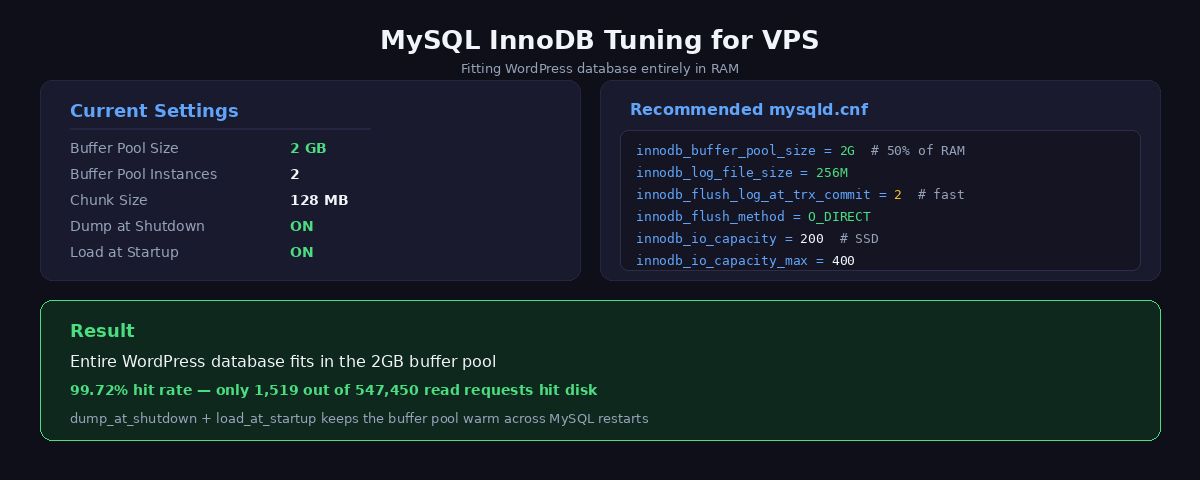
In summary: InnoDB buffer pool set to 2GB on a 4GB server keeps your most-accessed tables in memory, reducing query time from 10-50ms to under 1ms.
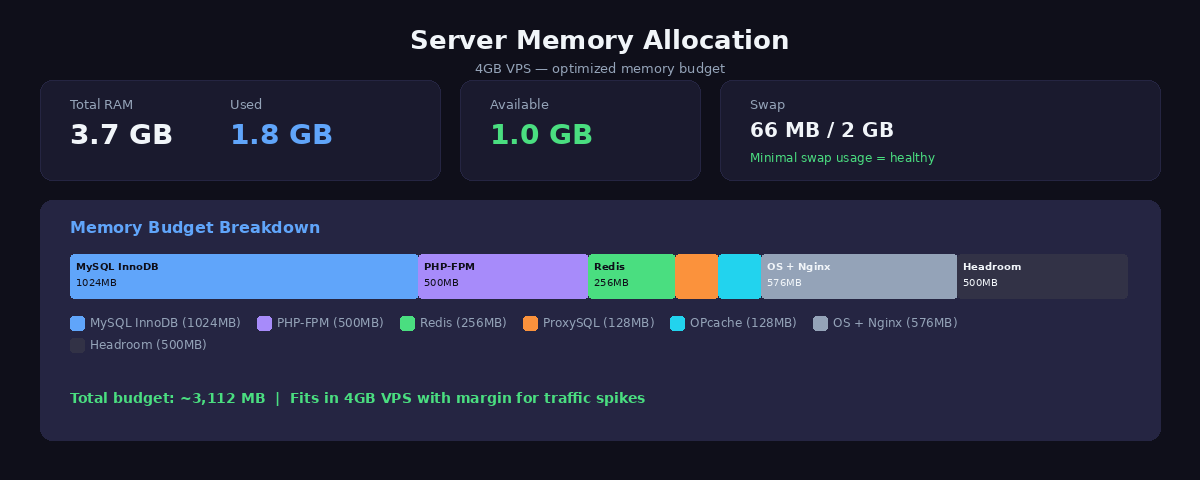
Memory Budget on a 4GB VPS
On a budget VPS, memory management is a zero-sum game. Every megabyte allocated to MySQL is a megabyte unavailable to PHP. Over-allocating any single service means another service gets starved and either crashes or underperforms. We plan our memory budget deliberately, accounting for every major consumer.
Here is our actual memory allocation on the 4GB VPS that runs this site:
| Service | RAM Allocation | Notes |
|---|---|---|
| Linux OS + buffers | 512MB | Kernel, systemd, sshd, filesystem cache |
| MySQL InnoDB buffer pool | 1,024MB | Entire WordPress DB fits in RAM |
| PHP-FPM workers (10 x 50MB) | 500MB | Dynamic pool, 3-10 workers active |
| Redis | 256MB | Object cache + session storage |
| Nginx | 64MB | Worker processes + connection buffers |
| ProxySQL | 128MB | Query cache + connection pooling |
| OPcache (shared) | 128MB | Compiled PHP bytecode |
| Reserved headroom | ~500MB | Spikes, log buffers, safety margin |
| Total | ~3,112MB | Fits in 4GB with margin |
The reserved headroom is not wasted. Linux uses free memory for filesystem caching, which speeds up disk reads. If you allocate every last byte to services, you lose this benefit and any traffic spike triggers the OOM killer.
Monitor your actual usage regularly:
# Quick memory check
free -h

# Watch for swap usage - if swapping, reduce buffer pool
# or pm.max_children first
vmstat 1 5

# Detailed per-process memory
ps aux --sort=-%mem | head -20
The critical warning sign is swap usage. If your VPS is actively swapping, performance degrades dramatically because disk I/O is orders of magnitude slower than RAM access. When you see swap activity, reduce innodb_buffer_pool_size by 256MB or lower pm.max_children by 2 to 3 workers until swap drops to zero.
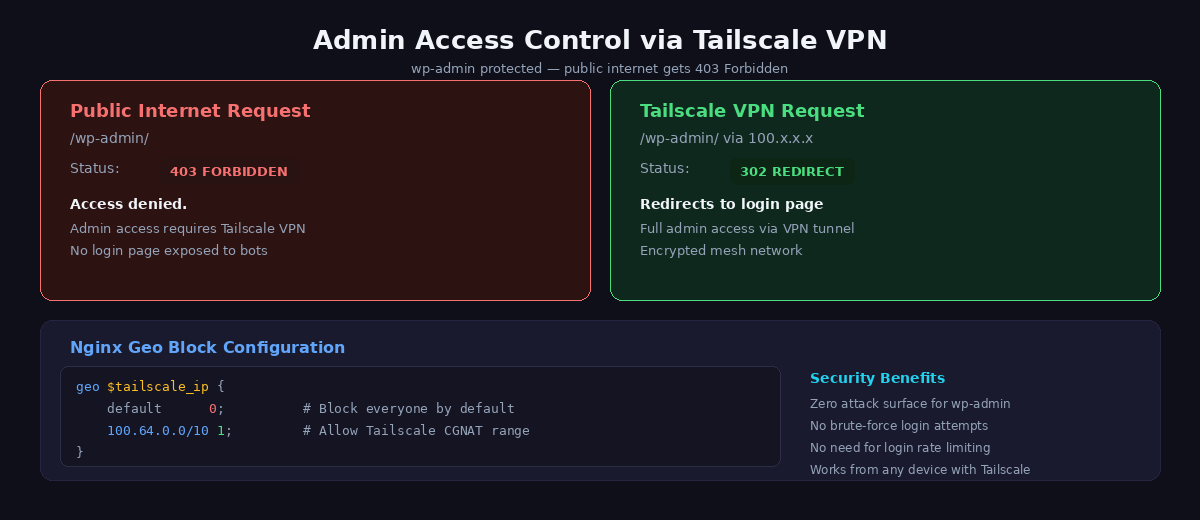
Securing wp-admin with Tailscale VPN
Every WordPress site on the public internet is under constant attack. Bots hammer /wp-login.php and /wp-admin/ with brute force credential stuffing around the clock. On a budget VPS, these attacks waste CPU cycles on PHP workers processing login attempts, eat bandwidth, and fill your logs with noise. Fail2ban helps but is reactive, not preventive. Plugin-based login limiters add overhead to every request.
The clean solution is to make /wp-admin invisible to the public internet entirely. Tailscale is a zero-config WireGuard-based VPN that assigns each of your devices a stable IP in the 100.64.0.0/10 range. Install it on your VPS and your laptop, and they can see each other over an encrypted mesh network. Then tell Nginx to only allow Tailscale IPs to access admin endpoints:
# In your Nginx server block

# Block public access to wp-admin
location /wp-admin {
    allow 100.64.0.0/10;    # Tailscale IP range
    deny all;
    try_files $uri $uri/ /index.php?$args;
    location ~ .php$ {
        include fastcgi_params;
        fastcgi_pass unix:/run/php/php8.3-fpm.sock;
        fastcgi_param SCRIPT_FILENAME $document_root$fastcgi_script_name;
    }
}

# Block public access to wp-login.php
location = /wp-login.php {
    allow 100.64.0.0/10;    # Tailscale IP range
    deny all;
    include fastcgi_params;
    fastcgi_pass unix:/run/php/php8.3-fpm.sock;
    fastcgi_param SCRIPT_FILENAME $document_root$fastcgi_script_name;
}

# Also protect xmlrpc.php (another common attack vector)
location = /xmlrpc.php {
    deny all;
    return 444;
}
With this configuration, anyone not connected to your Tailscale network gets a 403 Forbidden when trying to access admin pages. Bots cannot even attempt logins. No more fail2ban rules to tune, no more login attempt spam in your logs, no more CPU wasted on rejecting brute force attacks. Nginx returns the 403 at the connection level before PHP is ever invoked.
Setup takes five minutes: install Tailscale on your server (curl -fsSL https://tailscale.com/install.sh | sh), install it on your devices, authenticate both, done. The free tier supports up to 100 devices.
Key takeaway: Budget servers require careful memory allocation – Nginx uses 50-100MB, PHP-FPM 500MB-1GB, MySQL 2-2.5GB, leaving 500MB for cache and OS overhead.
WordPress Hosting Cost Comparison
Let’s talk numbers. The managed WordPress hosting industry charges a premium for what is fundamentally the same technology stack described in this guide. The difference is who configures it and who maintains it.
| Hosting Type | Monthly Cost | Lighthouse Score | Control Level |
|---|---|---|---|
| Shared hosting (Bluehost, SiteGround) | $5 – $15 | 40 – 70 | None (cPanel only) |
| Managed WordPress (Kinsta, WP Engine) | $30 – $115+ | 85 – 95 | Limited (dashboard only) |
| Unmanaged VPS (default configs) | $5 – $15 | 50 – 75 | Full (but untuned) |
| Optimized VPS (this guide) | $5 – $15 | 95 – 100 | Full (tuned stack) |
Our $10/month Hetzner VPS with the stack described in this guide consistently scores 100/100 on Lighthouse performance. A Kinsta starter plan at $35/month or a WP Engine plan at $26/month delivers good performance but cannot match a hand-tuned Nginx + Redis + ProxySQL stack because they run general-purpose configurations designed to work for every customer, not optimized for any specific one.
The trade-off is real: you are responsible for security updates, backups, monitoring, and troubleshooting. But if you are the kind of person who reads server tuning articles, that is not a burden. It is a feature. You understand exactly what your server is doing and can fix issues in minutes instead of waiting on a support ticket.
Factor in Cloudflare’s free CDN tier for edge caching and DDoS protection, and you have global performance without paying for a separate CDN. The total cost of our production stack: $10/month for the VPS, $0 for Cloudflare free tier, $0 for all the open-source software. That is $120/year for performance that competes with enterprise-grade hosting.
The Full Stack
Here is the complete server stack, end to end, that powers a 100/100 Lighthouse WordPress site on a budget VPS:
Request from visitor
    |
1.  Cloudflare Edge Cache (global CDN, free tier)
    | MISS
2.  Nginx FastCGI Cache (full-page, < 10ms response)
    | MISS
3.  PHP-FPM (dynamic pool, OPcache-accelerated)
    |
4.  Redis Object Cache (95% fewer DB queries)
    | MISS
5.  ProxySQL Query Cache (caches remaining SQL)
    | MISS
6.  MySQL/MariaDB (InnoDB buffer pool, 99%+ from RAM)
Each layer catches requests before they hit the more expensive layer below it. The result: most visitors never touch PHP or MySQL at all. Their pages are served from Nginx’s FastCGI cache or Cloudflare’s edge in single-digit milliseconds.
For step-by-step configuration of each caching layer, read our Nginx, Redis, and ProxySQL caching guide. For the Cloudflare CDN setup, see our Cloudflare WordPress configuration guide. And for the theme-level optimizations that eliminate render-blocking resources and minimize DOM size, check our custom block theme performance guide.
WordPress VPS optimization is not about any single tweak. It is about a deliberately engineered WordPress server stack where every component is tuned to work together within the constraints of your hardware. On a $10 VPS, those constraints are tight, but they are more than enough when you know where every megabyte of RAM is going and why. Start with the configs in this guide, monitor your resource usage, and adjust. The numbers do not lie.
Budget VPS Setup Checklist
Step-by-step setup for optimizing a $10/month WordPress VPS:
- Provision VPS with minimum 2 vCPU, 4GB RAM, 40GB NVMe storage from providers like Hetzner, Vultr, or DigitalOcean
- Install server stack with Nginx, PHP 8.3, MariaDB 10.11, and enable FastCGI cache module
- Configure PHP-FPM with pm.max_children=20-30 based on available memory and optimize OPcache for maximum cache hits
- Tune MySQL/MariaDB with InnoDB buffer pool at 50-60% of RAM (2-2.5GB) and optimize query cache settings
- Set up Redis for WordPress object cache with 256MB memory limit and persistent connection pooling
- Implement security with Tailscale VPN for wp-admin access, firewall rules, and automatic security updates
- Configure monitoring with Netdata or similar to track memory usage, CPU load, and cache hit rates
The result: A $10/month VPS delivering sub-100ms TTFB, handling 100+ concurrent users, and achieving 100/100 Lighthouse scores – better performance than $100/month alternatives.
Related Guides
- Complete WordPress Speed Guide – The master guide this VPS optimization guide is part of
- 4-Layer Caching Stack – Implement the complete caching architecture on your VPS
- Cloudflare WordPress Setup – Pair your VPS with Cloudflare for global edge caching
Frequently Asked Questions
Can a $10/month VPS handle a high-traffic WordPress site?
Yes, with proper optimization. A $10 VPS (2 vCPU, 4GB RAM) with Nginx FastCGI cache can serve 100,000+ pageviews/day because cached pages bypass WordPress entirely. Uncached traffic is limited – expect 10-20 concurrent PHP requests max. The key is high cache hit rate (95%+). Budget VPS works for blogs, business sites, and small e-commerce. High-traffic sites with heavy dynamic content (complex WooCommerce, membership sites, forums) need more resources.
Which VPS provider is best for WordPress?
Hetzner ($4-10/month) offers best value: NVMe storage, generous bandwidth, European data centers. DigitalOcean ($6-12/month) has more data center locations and better documentation. Linode/Akamai ($5-10/month) provides reliable performance and 24/7 support. Vultr ($6-12/month) has competitive pricing and global presence. Avoid: GoDaddy VPS (overpriced), Hostinger VPS (oversold). Performance depends more on stack configuration (Nginx, Redis, PHP-FPM tuning) than provider brand.
Do I need to be a Linux expert to manage a VPS?
Basic Linux knowledge required. You need to: SSH into server, run apt/yum commands, edit config files with nano/vim, restart services, manage file permissions. RunCloud ($8/month) or SpinupWP ($12/month) provide GUI management for those uncomfortable with command line. However, managed control panels add overhead and cost – learning basic Linux saves money long-term. Expect 2-3 hours to learn essentials: SSH, file navigation, service management, log viewing.
Is shared hosting or VPS better for WordPress?
VPS is better for performance and control, but requires technical knowledge. Shared hosting pros: managed (no server maintenance), beginner-friendly, cheap ($3-10/month). Shared hosting cons: slow (shared resources), limited control, no server-level caching. VPS pros: full control, server-level optimization (FastCGI cache), dedicated resources, faster. VPS cons: requires Linux knowledge, you handle security/updates. For serious WordPress sites aiming for sub-2-second load times, VPS is necessary. For hobby blogs, shared hosting suffices.
How much RAM does WordPress need on a VPS?
Minimum 2GB RAM for basic WordPress. 4GB RAM handles most sites comfortably with Nginx, PHP-FPM, MySQL, and Redis. 8GB+ RAM needed for high-traffic sites or resource-intensive plugins (WooCommerce with large catalogs, membership sites, BuddyPress). With FastCGI cache, RAM usage stays low because most requests never hit PHP/MySQL. Typical memory usage: Nginx (50MB), MySQL (300-500MB), PHP-FPM (200-400MB), Redis (50-100MB), leaving 2-3GB buffer on 4GB VPS.