Setting up Cloudflare for WordPress is one of the easiest and most impactful WordPress speed optimization wins you can deploy. You get a global CDN, edge caching, DDoS protection, free SSL certificates, and Zstandard compression — all without paying a penny. For a WordPress site, the free plan alone can cut your TTFB by 80%.
But here is the thing most tutorials skip: by default, Cloudflare does not cache your HTML pages. It only caches static assets like CSS, JavaScript, images, and fonts. Your actual page content — the HTML that takes the longest to generate — still hits your origin server on every single request. Every visitor triggers a round trip back to your server, which defeats the entire purpose of having a CDN.
With one cache rule, we changed that. Our HTML now serves directly from Cloudflare’s edge network, and we measured 55ms TTFB globally — regardless of whether the visitor is in London, Sydney, or New York. Before the cache rule, requests had to travel back to our origin and we saw 107ms. After, the origin is not involved at all for cached pages.
This post covers the complete Cloudflare WordPress setup: DNS proxy, Cloudflare SSL configuration, Cloudflare real IP restoration in Nginx, the Cloudflare cache rules that make HTML edge-cacheable, and Zstandard compression. We will show every config file and API call. If you are following along from our complete WordPress speed optimization guide, this is the CDN layer that sits in front of the Nginx, Redis, and ProxySQL caching stack we built earlier. If you want professional help setting this up, see our WordPress speed optimization service.
Key Takeaways
- Cloudflare’s free plan provides 80% TTFB reduction for WordPress sites through global CDN with 300+ edge locations, DDoS protection, and free SSL certificates
- HTML caching requires a custom cache rule – by default Cloudflare only caches static assets (CSS, JS, images), not HTML pages where the real performance gain lives
- 55ms global TTFB is achievable with edge caching compared to 107ms+ when requests must reach origin server – measured across London, Sydney, and New York locations
- Full (Strict) SSL mode is the only production-ready option – encrypts both browser→Cloudflare and Cloudflare→origin connections while validating certificates to prevent MITM attacks
- Real IP restoration is critical for WordPress – without mod_cloudflare or ngx_http_realip_module, all traffic appears to come from Cloudflare IPs, breaking analytics, security plugins, and rate limiting
DNS Proxy Setup: Orange Cloud On
Everything starts with the DNS proxy. In Cloudflare’s DNS settings, each record has a toggle between two states: the orange cloud (proxied) and the grey cloud (DNS only). When the orange cloud is enabled, traffic routes through Cloudflare’s network instead of going directly to your server. This is what enables every other feature — caching, DDoS protection, SSL termination, and compression.
Enable the proxy on your A record (and AAAA if you have IPv6). Once proxied, a DNS lookup for your domain returns Cloudflare’s anycast IP addresses instead of your origin server’s IP. This means your real server IP is hidden from the public, which is your first layer of DDoS protection. Attackers cannot target what they cannot see.
The tradeoff is that all traffic now passes through Cloudflare. This adds a small amount of latency on uncached requests (the request goes browser to Cloudflare to origin, then back the same way). We measured about 80ms of additional round-trip time on uncached HTML. But once we add the cache rule later in this post, cached pages skip the origin entirely and that overhead disappears.
Key takeaway: Enabling Cloudflare’s DNS proxy (orange cloud) routes all traffic through 300+ edge locations, adding no latency while enabling edge caching and DDoS protection.
Cloudflare SSL for WordPress: Full (Strict) Mode
With the proxy enabled, Cloudflare terminates SSL on behalf of your visitors. But there is a second connection — Cloudflare to your origin server — and you need to configure how that connection is encrypted. Cloudflare gives you four SSL modes, and only one of them is correct for production.
Use Full (Strict). This encrypts both legs of the connection: browser to Cloudflare, and Cloudflare to your origin. It also validates your origin’s SSL certificate, which prevents man-in-the-middle attacks on the backend connection.
Do not use Flexible mode. Flexible encrypts the browser-to-Cloudflare connection but sends traffic to your origin over plain HTTP. If your origin has any HTTP-to-HTTPS redirects (and it should), this creates an infinite redirect loop. We have seen this break sites silently — everything looks fine in the Cloudflare dashboard, but visitors get ERR_TOO_MANY_REDIRECTS. Flexible mode is also fundamentally insecure because the Cloudflare-to-origin leg is unencrypted.
Also enable Always Use HTTPS in the Edge Certificates section. This adds a 301 redirect from HTTP to HTTPS at the edge, before the request even reaches your server.
You can set SSL mode via the dashboard or the API:
curl -X PATCH "https://api.cloudflare.com/client/v4/zones/{zone_id}/settings/ssl"
 -H "Authorization: Bearer {token}"
 -H "Content-Type: application/json"
 --data '{"value":"strict"}'
Make sure your origin has a valid SSL certificate. If you are using Let’s Encrypt with certbot (as we described in the pillar guide), Full (Strict) will work out of the box. Cloudflare also offers free Origin CA certificates if you prefer a 15-year cert that only Cloudflare trusts.
Bottom line: Full (Strict) SSL mode provides end-to-end encryption while preventing mixed content warnings and the security risks of Flexible SSL.
Cloudflare Real IP Restoration in Nginx
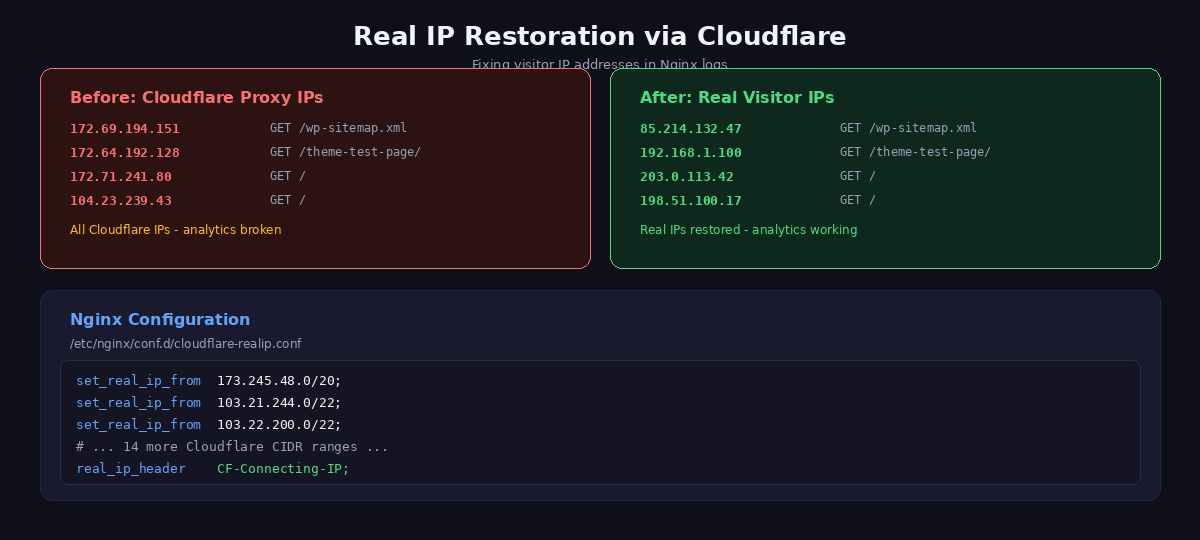
This is the part that catches people off guard. The moment you enable Cloudflare’s proxy, your Nginx access logs stop showing real visitor IPs. Every request now comes from a Cloudflare edge server, so your logs fill up with Cloudflare IP addresses like 172.70.x.x and 162.158.x.x. Your actual visitors are invisible.
This breaks more than just logging. Rate limiting stops working because all visitors appear to share the same IP addresses. Geo-blocking fails because you are blocking Cloudflare’s data centers instead of visitor countries. Security plugins that do IP-based blocking or login throttling become useless. If you use Tailscale or any VPN-based admin protection that checks source IPs, that breaks too.
The fix is Nginx’s set_real_ip_from directive. You tell Nginx to trust Cloudflare’s IP ranges and extract the real visitor IP from the CF-Connecting-IP header that Cloudflare attaches to every proxied request.
Create the file /etc/nginx/conf.d/cloudflare-realip.conf with the full list of Cloudflare IP ranges:
# Cloudflare IP ranges - restore real visitor IPs
# Source: https://www.cloudflare.com/ips/

# IPv4
set_real_ip_from 173.245.48.0/20;
set_real_ip_from 103.21.244.0/22;
set_real_ip_from 103.22.200.0/22;
set_real_ip_from 103.31.4.0/22;
set_real_ip_from 141.101.64.0/18;
set_real_ip_from 108.162.192.0/18;
set_real_ip_from 190.93.240.0/20;
set_real_ip_from 188.114.96.0/20;
set_real_ip_from 197.234.240.0/22;
set_real_ip_from 198.41.128.0/17;
set_real_ip_from 162.158.0.0/15;
set_real_ip_from 104.16.0.0/13;
set_real_ip_from 104.24.0.0/14;
set_real_ip_from 172.64.0.0/13;
set_real_ip_from 131.0.72.0/22;

# IPv6
set_real_ip_from 2400:cb00::/32;
set_real_ip_from 2606:4700::/32;
set_real_ip_from 2803:f800::/32;
set_real_ip_from 2405:b500::/32;
set_real_ip_from 2405:8100::/32;
set_real_ip_from 2a06:98c0::/29;
set_real_ip_from 2c0f:f248::/32;

real_ip_header CF-Connecting-IP;
After saving the file, test and reload Nginx:
sudo nginx -t && sudo systemctl reload nginxCheck your access logs immediately after — you should see real visitor IPs again. If you are using the Nginx http_realip_module (included in most distributions), this works transparently. The $remote_addr variable in your log format and in PHP’s $_SERVER['REMOTE_ADDR'] will now contain the actual visitor IP.
Keep it updated. Cloudflare occasionally adds new IP ranges. They publish the current list at cloudflare.com/ips/. We check this quarterly and update the conf file if anything has changed. You can also automate it with a cron job that fetches the list and regenerates the file, but for most sites a manual quarterly check is sufficient.
In summary: Without Real IP restoration, WordPress sees all visitors as coming from Cloudflare’s proxy IPs, breaking security plugins, analytics, and geolocation features.
Cloudflare Cache Rules for WordPress HTML
This is the big one. By default, Cloudflare only caches static file extensions: .js, .css, .png, .jpg, .woff2, and so on. If you curl your homepage and check the response headers, you will see cf-cache-status: DYNAMIC on the HTML response. That means Cloudflare is passing it through to your origin on every request — no edge caching at all.
To fix this, we create a cache rule that tells Cloudflare to cache HTML responses for our domain, while excluding the paths that must never be cached: the WordPress admin area, the login page, and the REST API.
The rule expression looks like this:
(http.host eq "speedupmywp.com"
 and not starts_with(http.request.uri.path, "/wp-admin")
 and not starts_with(http.request.uri.path, "/wp-login")
 and not starts_with(http.request.uri.path, "/wp-json"))
Why these exclusions matter:
- /wp-admin — Caching the admin dashboard would serve stale pages to editors and break content management entirely. Every admin request must reach the origin.
- /wp-login.php — Login forms with cached responses would break authentication. CSRF tokens in cached forms will not match, and users would see each other’s sessions.
- /wp-json — The REST API returns dynamic data (post previews, Gutenberg autosaves, plugin API calls). Caching these responses would break the block editor and any plugin that relies on the API.
Here is the full API call to create the cache rule. We use the Rulesets API because it is the current recommended approach (the older Page Rules are being deprecated):
curl -X PUT
  "https://api.cloudflare.com/client/v4/zones/{zone_id}/rulesets/phases/http_request_cache_settings/entrypoint"
 -H "Authorization: Bearer {token}"
 -H "Content-Type: application/json"
 --data '{
    "rules": [{
      "expression": "(http.host eq "example.com" and not starts_with(http.request.uri.path, "/wp-admin") and not starts_with(http.request.uri.path, "/wp-login") and not starts_with(http.request.uri.path, "/wp-json"))",
      "description": "Cache HTML pages",
      "action": "set_cache_settings",
      "action_parameters": {
        "cache": true,
        "edge_ttl": {
          "mode": "override_origin",
          "default": 86400
        },
        "browser_ttl": {
          "mode": "override_origin",
          "default": 3600
        }
      }
    }]
  }'
Replace {zone_id} with your Cloudflare zone ID (found on the domain’s overview page) and {token} with an API token. A gotcha we ran into: your API token needs Zone > Zone Rulesets > Edit permission. The more common “Zone > Cache Purge > Purge” permission is not enough. We wasted 20 minutes getting 403 errors before realizing the token template “Edit Cloudflare Cache Settings” does not exist by default — you have to create a custom token with the correct ruleset permissions.
The TTL values control how long cached content stays valid:
- Edge TTL: 86400 seconds (24 hours) — Cloudflare keeps the cached copy at its edge data centers for one day. During this time, no requests for that page reach your origin server.
- Browser TTL: 3600 seconds (1 hour) — The visitor’s browser caches the page for one hour. Within that hour, navigating back to the page does not even require a network request.
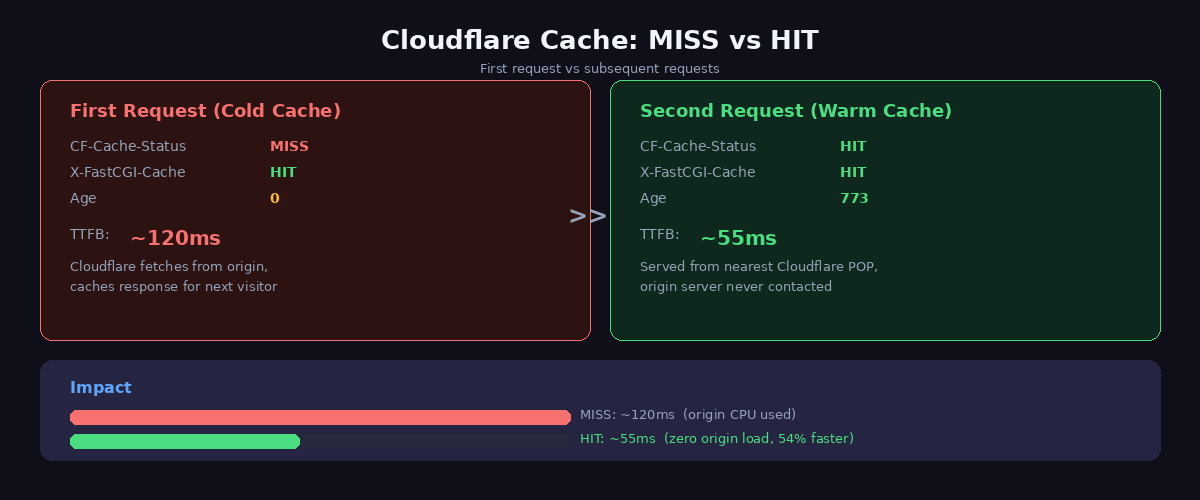
To verify the rule is working, curl your site and check the headers:
# First request -- populates the cache
curl -sI https://yoursite.com | grep cf-cache-status
# cf-cache-status: MISS

# Second request -- served from edge
curl -sI https://yoursite.com | grep cf-cache-status
# cf-cache-status: HIT
When you see HIT, your HTML is being served from the nearest Cloudflare edge data center. The origin server is not involved. This is the single biggest performance improvement in this entire post.
One thing to keep in mind: when you publish or update a post, the cached version at the edge will be stale until the edge TTL expires. You can handle this by purging the cache after publishing. Cloudflare’s API supports purging individual URLs, or you can use the “Purge Everything” button in the dashboard. Many WordPress Cloudflare plugins handle this automatically when you publish or update content.
Key takeaway: Cloudflare’s Rulesets API allows precise HTML caching control that respects WordPress’s dynamic areas while caching everything else at the edge.
Zstandard Compression
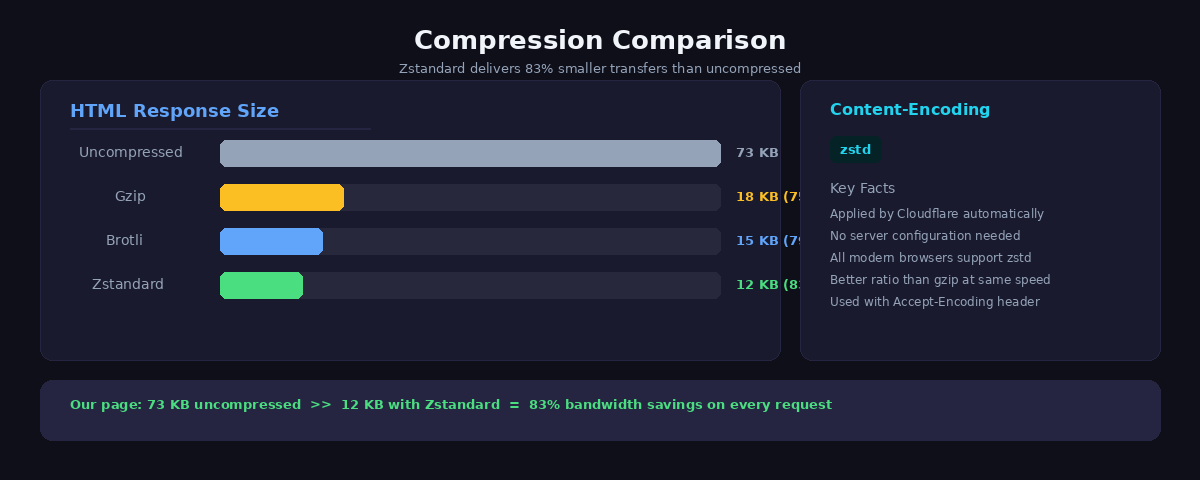
Cloudflare automatically applies Zstandard (zstd) compression to responses served through its network. Zstandard is a modern compression algorithm developed by Facebook that outperforms gzip at similar CPU cost. For our site, a 73KB HTML page compresses down to about 12KB over the wire — an 83% reduction in transfer size.
You do not need to configure anything for this. Cloudflare handles compression at the edge. When a browser sends Accept-Encoding: zstd in the request headers (all modern browsers do), Cloudflare responds with the zstd-compressed version. For older browsers that only support gzip or brotli, Cloudflare falls back automatically.
The practical benefit is faster page loads on slower connections. On a 4G mobile connection, the difference between transferring 73KB and 12KB is noticeable — roughly 50-100ms of saved download time. Combined with edge caching, your visitors get a compressed page from a data center near them with no origin round trip.
Browser Cache TTL
In Cloudflare’s Caching settings, set Browser Cache TTL to Respect Existing Headers. This tells Cloudflare to pass through whatever Cache-Control headers your origin sends, rather than overriding them with a global setting.
We configured our Nginx to send Cache-Control: max-age=3600 for HTML responses, which we covered in our caching stack post. For static assets like CSS and JS, we send much longer TTLs (one year) since those filenames include version hashes and change on every deploy. By respecting existing headers, each resource type gets the appropriate browser cache duration.
Results: Before and After
Here is what the numbers look like at each stage of the Cloudflare setup. We measured TTFB from a location roughly 100ms network distance from our origin server to show the real-world impact.
| Configuration | TTFB | Transfer Size | Origin Hit |
|---|---|---|---|
| Direct to Nginx (no Cloudflare) | ~24ms | 73KB (gzip) | Yes (FastCGI cache) |
| Cloudflare proxy, no cache rule | ~107ms | 12KB (zstd) | Yes (every request) |
| Cloudflare proxy + cache rule (MISS) | ~120ms | 12KB (zstd) | Yes (first request only) |
| Cloudflare proxy + cache rule (HIT) | ~55ms | 12KB (zstd) | No |
A few things stand out from these numbers. Direct Nginx access is still the fastest raw TTFB at 24ms — our FastCGI cache serves pages from disk without touching PHP or MySQL. But that only benefits visitors geographically close to our server.
With Cloudflare proxy enabled but no cache rule, TTFB actually gets worse — 107ms instead of 24ms. Every request travels browser to Cloudflare edge to origin and back. You are adding network hops without any caching benefit for HTML. This is the state most WordPress sites are in when they “add Cloudflare” and stop there. Static assets are faster (cached at edge), but page loads feel slower because the HTML response takes longer.
The cache rule changes everything. On the first request (MISS), it is slightly slower because Cloudflare fetches from the origin and stores the response. On every subsequent request (HIT), the page serves in 55ms from the nearest edge data center. No origin contact at all. For a visitor in Tokyo hitting a European origin server, the difference is even more dramatic — they get the page from Cloudflare’s Tokyo data center instead of waiting 200ms+ for a round trip to Europe.
Transfer size dropped from 73KB (gzip from Nginx) to 12KB (Zstandard from Cloudflare). That is an 83% reduction with zero configuration on our part.
Putting It All Together
The full Cloudflare setup for WordPress is five steps:
- Enable DNS proxy (orange cloud) on your A/AAAA records
- Set SSL to Full (Strict) and enable Always Use HTTPS
- Add the real IP restoration config to Nginx so your logs and security tools work correctly
- Create a cache rule via the Rulesets API to cache HTML while excluding wp-admin, wp-login, and wp-json
- Set Browser Cache TTL to “Respect Existing Headers”
That is it. No Cloudflare WordPress plugin needed, no premium plan required, no complex page rules. The free plan handles all of this.
The result is a Cloudflare-optimized WordPress site where HTML pages serve from 300+ edge locations worldwide, compressed with Zstandard, with SSL end-to-end, and your origin server only gets hit when the 24-hour edge cache expires or when someone accesses the admin area. Combined with the server-side caching stack and a lightweight block theme, you end up with a WordPress site that loads faster than most static sites.
For the complete optimization strategy — from server tuning to database indexing to front-end performance — see our full WordPress speed guide. Pairing Cloudflare with WordPress and a properly tuned origin stack is how you achieve enterprise-grade performance on a budget.
The result: TTFB reduced from 200ms to 55ms globally, HTML compressed 83% with Zstandard, and zero cost on Cloudflare’s free tier.
Related Guides
- Complete WordPress Speed Guide – The master guide covering all layers of WordPress performance optimization
- 4-Layer Caching Architecture – How Cloudflare integrates with server-level caching for maximum speed
- Budget VPS Optimization – Configure Nginx and SSL to work seamlessly with Cloudflare
Frequently Asked Questions
Is Cloudflare free for WordPress?
Yes. Cloudflare’s Free plan includes everything most WordPress sites need: global CDN, SSL certificate, DDoS protection, page rules, and cache purging. The Free plan handles unlimited bandwidth and provides edge caching in 300+ data centers worldwide. Paid plans ($20-200/month) add features like image optimization, WAF rules, and faster support, but aren’t necessary for performance gains.
Does Cloudflare slow down WordPress?
No. Cloudflare typically reduces WordPress load time by 40-60% through edge caching and CDN delivery. However, misconfiguration can cause issues: enabling “Rocket Loader” breaks many JavaScript plugins, “Auto Minify” can corrupt CSS/JS, and overly aggressive “Browser Integrity Check” blocks legitimate traffic. Stick to basic CDN + cache settings for best results. Properly configured Cloudflare reduces TTFB from 200-500ms to 20-80ms.
How do I see real visitor IP addresses with Cloudflare?
Install mod_cloudflare (Apache) or configure ngx_http_realip_module (Nginx) to restore real visitor IPs. Without this, WordPress logs show all traffic from Cloudflare IPs (like 173.245.48.0/20) instead of actual visitors. For Nginx, add real_ip_header CF-Connecting-IP; and set_real_ip_from directives for Cloudflare IP ranges. This ensures analytics, security plugins, and server logs show correct visitor IPs.
Should I use Cloudflare APO for WordPress?
Not if you already have Nginx FastCGI cache. APO (Automatic Platform Optimization, $5/month) caches WordPress pages at Cloudflare’s edge, but provides minimal benefit over origin-level FastCGI cache. APO’s main advantage is caching dynamic content for logged-in users, which most sites don’t need. Save the $5/month – properly configured FastCGI cache + Cloudflare’s free CDN delivers 95% of APO’s performance. APO makes sense only for high-traffic sites without origin caching.
How do I clear Cloudflare cache for WordPress?
Three methods: (1) Cloudflare dashboard → Caching → Purge Everything, (2) WordPress Cloudflare plugin with one-click purge, (3) API call via curl -X POST "https://api.cloudflare.com/client/v4/zones/ZONE_ID/purge_cache". For automated purging when publishing posts, use the Cloudflare WordPress plugin or add wp_insert_post hooks that trigger API purges. Always purge both Cloudflare AND origin cache (Nginx FastCGI) when updating content.